Integrating a VT220 (or similar DEC terminal) into my OS X workflow | Part 1

VT220 terminal, outside because that's where the radio it was connected to was.
Introduction
I’ve always had a fascination with ‘retro’ computers, and how they might work with today’s technology. Through a lucky turn of events, I came into a DEC VT220, and later a DEC VT510. These are well-known terminals (text-based computer monitors) that take a serial input and display output on their CRT screen. If you think of going into the bank in the early 90s, or using a computer at a local library where you had press ‘F12’ a lot, you have the right idea.
It turns out, though these are rare items today, they’re still eminently usable piece of computing history.
Obtaining a Screen
I hadn’t had much to do with outmoded technology until I wanted a simple approach to interfacing with a 1980s packet radio modem (not discussed on this blog). In order to do this, I found that I could buy about 3 adapters for my 2017 MacBook Pro, or use something called a “terminal” as the end-user device. Googling and remembering some exposure from my early childhood, I was intrigued.
I Googled/eBay’d for nights, trying fruitlessly to locate one for sale without paying hundreds in shipping from the US. Casually I mentioned this challenge to my partner, who to her endless credit located one for sale in 3 minutes, 10 minute’s drive away. This is the machine pictured above, successfully interfacing with my packet radio, communicating with a nearby friend.
Unfortunately not long after taking ownership of the VT220 with its sublime amber screen, a suspected failure of the flyback transformer (a component to make the CRT work) rendered it inoperable. Luckily the seller offered me some other models he had available, and I was able to recover with a DEC VT510, an updated modem with a white phosphur screen.
After a few weeks of idly wondering how to use the terminal as an extension to my OS X workflow, I set about doing just this.
Setup
Materials
I started with the following:
- 2017 MacBook Pro 15”
- USB-C Digital AV Multiport Adapter
- 1991 DEC VT510 Terminal with keyboard
- USB to DB9M RS-232 Converter I had also installed prolific drivers for the above USB to RS-232 cable.
In order to connect everything together, I purchased a DB9 Female to DB25 Male Null Modem Cable, and waited for it to be shipped.
Once I assembled the necessary adapters, I tested communication between the MacBook Pro and the DEC VT510. To do this, I found that my USB adapter was at /dev/tty.usbserial, so setting the DEC to 9600 baud, into the Terminal I typed:
screen -a /dev/tty.usbserial 9600
I was presented with a black screen. If I typed characters on the MacBook Pro they appeared on the VT510, and if I typed on the VT510’s terminal the characters appeared on the terminal of the MacBook Pro. Success!
Configuration
I heavily relied upon jstn’s tumblr post for pictorial inspiration, and mdille3’s documentation to technically guide me. In particular, I performed the following:
Creation of .plist file
I created the following .plist file at /Library/LaunchDaemons/serialconsole.plist. This defines a Launch Daemon (a process that runs in the background from startup).
<?xml version="1.0" encoding="UTF-8"?>
<!DOCTYPE plist PUBLIC "-//Apple//DTD PLIST 1.0//EN" "http://www.apple.com/DTDs/PropertyList-1.0.dtd">
<plist version="1.0">
<dict>
        <key>Label</key>
        <string>serialconsole</string>
        <key>ProgramArguments</key>
        <array>
                <string>/usr/libexec/getty</string>
                <string>custom.9600</string>
                <string>tty.usbserial</string>
        </array>
        <key>KeepAlive</key>
        <true/>
</dict>
</plist>
This Launch Daemon runs the command /usr/libexec/getty custom.9600 tty.usbserial, in the only way supported on OS X — you can’t invoke getty via the command line.
I then added the following to define custom.9600 in /etc/gettytab:
custom.9600:\
        :np:sp#9600:im=\r\n:al=joel:lo=/Users/joel/bin/quietlogin.sh:
I created ~/bin/quietlogin.sh, which mdille3 recommends.
#!/bin/bash

ARGS=("$@")

for ((i=0; i < $#; i++)); do
  ARGS[$i]=`echo ${ARGS[$i]} | sed 's/-f\(.*\)/-fq\1/'`
done

exec /usr/bin/login "${ARGS[@]}"
Finally, I needed to add my own invocation of tmux to ensure keyboardless control of the VT510. I added the following to ~/.profile, which is run at each login of my terminal:
if [ $TERM == "su" ]
then
  export TERM="vt220"
  export LC_ALL="en_US.ISO8859-1"
  tmux attach-session -t "vt220"
fi

if [ $TERM == "screen" ]
then
  export LC_ALL="en_US.ISO8859-1"
  export TERM="vt220"
fi
Because I don’t use tmux anywhere else, I was happy telling all tmux sessions that they would be running on a vt220 with export TERM="vt220". This setting ensures that programmes know how to render themselves on the screen. I also told the vt510 it was in VT220 emulation mode.
Before the VT510 starts, the host computer (my MacBook Pro) needs to have invoked a tmux session with tmux new-sesion -t 'vt220'. The name does not matter, as long as it is consistent across invocation and the tmux attach-session command in my ~/.profile.
Now, whenever I turn on my terminal, it fleetingly complains of a keyboard error (I have permanently disconnected it), then launches immediately into the shared tmux session running on my MacBook Pro.
I then access the tmux session minimised on the laptop — no need looking at two screens showing me the same thing — and as long as I’m open in my terminal programme, I can control the DEC terminal with all of the modern luxuries of my MacBook Pro.
Result
After this effort, you should be able to see a prompt on your screen, as well as the time and date in the lower left hand corner.
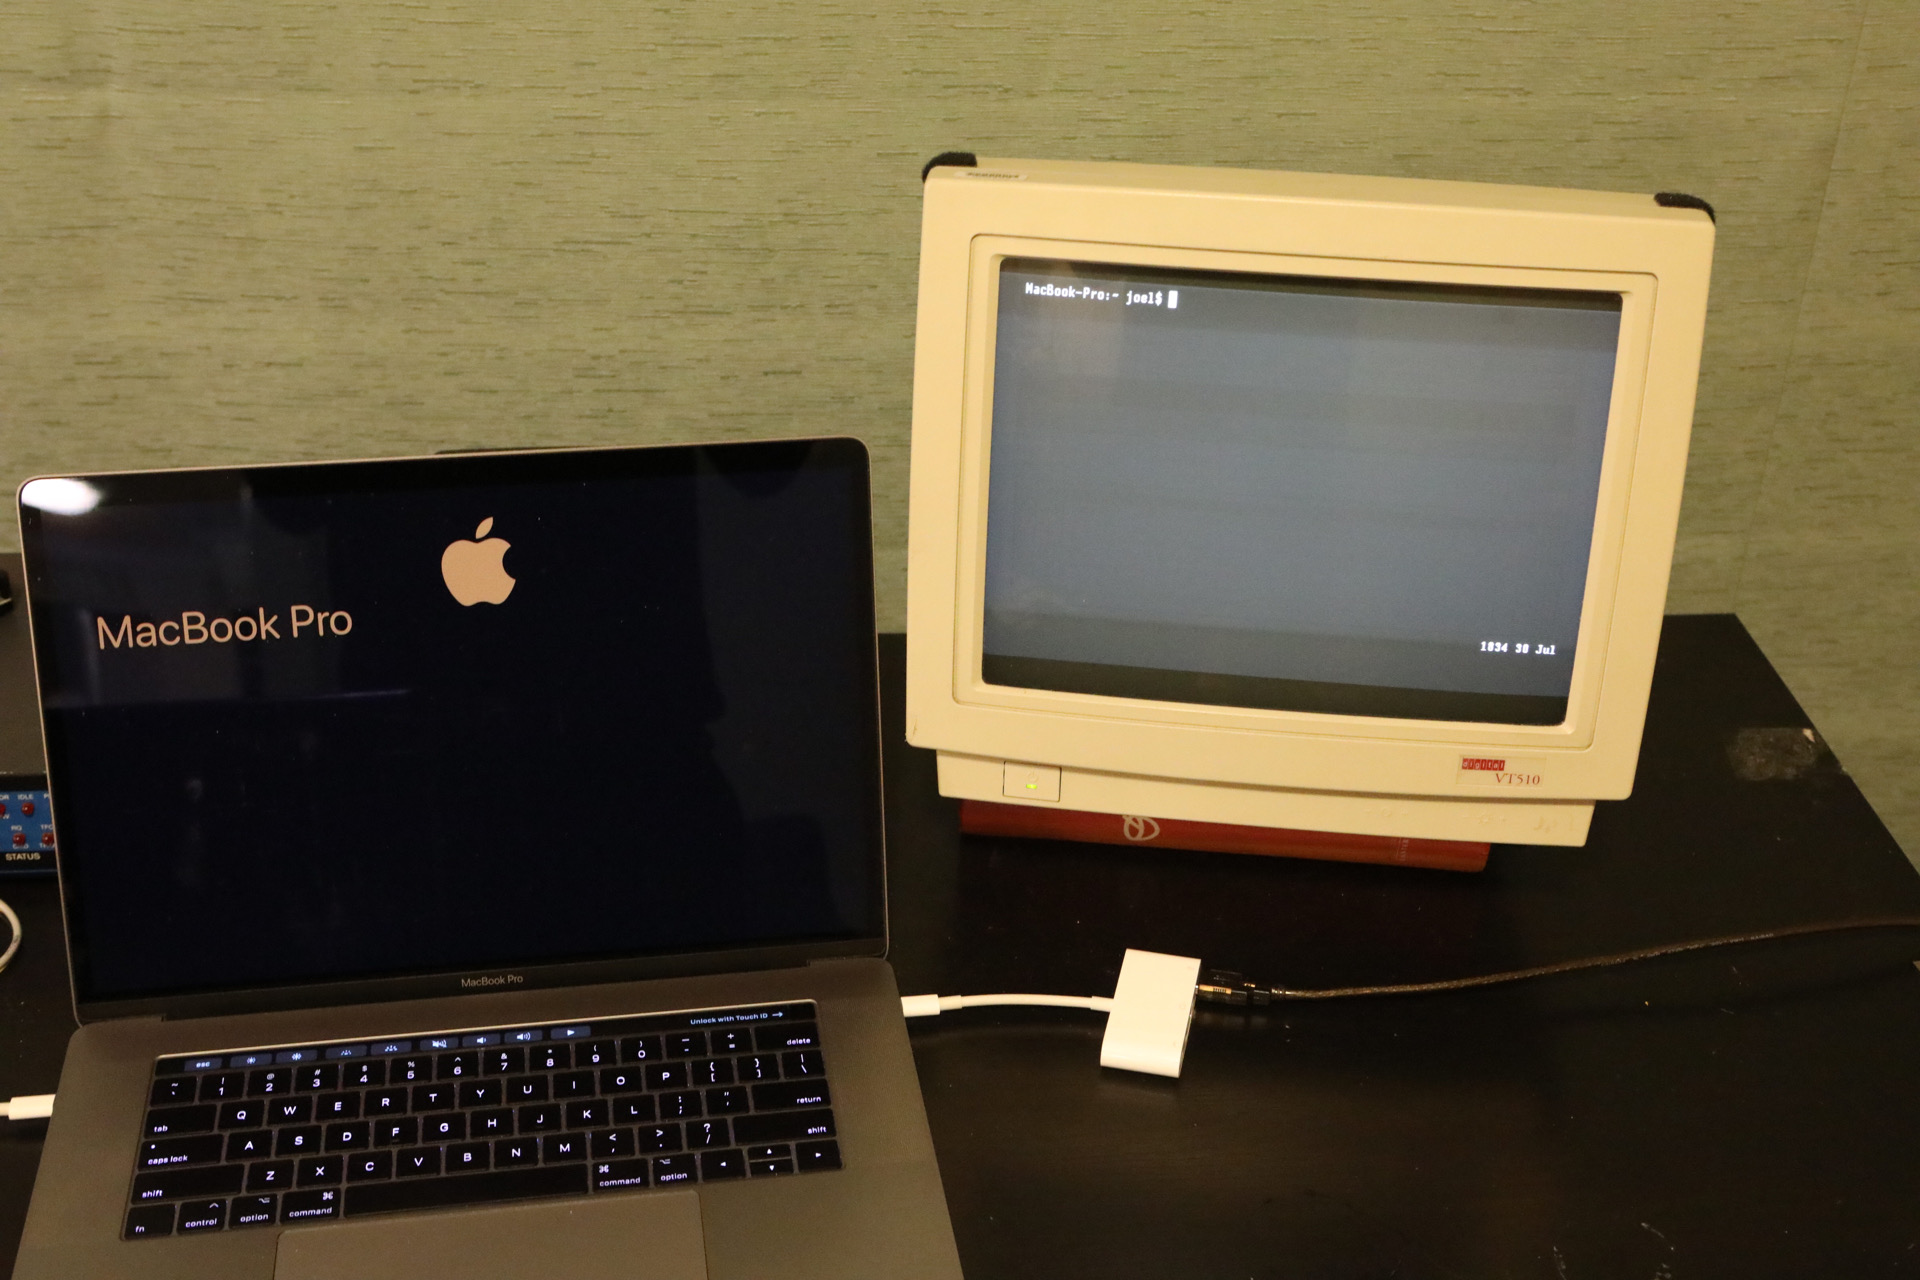
Shot of VT510 logged into Macbook Pro via tmux
Up Next in the Series
Applications for daily use: email
More Information
- https://drewdevault.com/2016/03/22/Integrating-a-VT220-into-my-life.html
- http://www.club.cc.cmu.edu/~mdille3/doc/mac_osx_serial_console.html
- http://a2central.com/2126/apple-ii-to-mac-intelligent-serial-terminal-file-transfers/
- https://jstn.tumblr.com/post/8692501831
- http://www.iljitsch.com/2020/01-25-logging-in-on-my-mac-using-a-vt420-terminal.html
- https://superuser.com/questions/1059744/serial-console-login-on-osx/1062709
- https://hints.macworld.com/article.php?story=20030724135653825
- http://www.longsteve.com/fixmybugs/?p=768
- https://superuser.com/questions/1059744/serial-console-login-on-osx
- https://gist.github.com/albertfilice/0f12dc87f8d1ec02ef14
- https://www.reddit.com/r/unixporn/comments/37l08c/vt510_9600bps/?utm_name=iossmf
- http://0pointer.de/blog/projects/serial-console.html
- https://changelog.complete.org/archives/category/technology/hardware
- http://www.isticktoit.net/?p=1728
- https://www.vt100.net/docs/vt320-uu/chapter5.html#T5-1